To enable the Home Screen, go to:
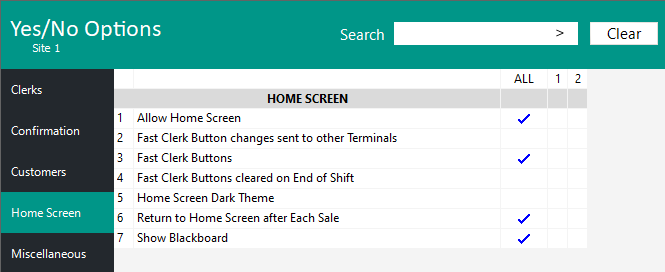
Setup > Yes/No Options > Home Screen
Depending on how you want the Home Screen to behave, you will need to enable the options that are applicable to the behaviour you require.
- Allow Home Screen - To enable the Home Screen, this option should be enabled. It will set the Home Screen as the main entry into the POS Screen.
- Fast Clerk Button changes sent to other Terminals - This option will trigger any changes to the Fast Clerk buttons to be sent to other terminals. Depending on how your Clerks use the terminals, this may or may not be required. E.g. If you have clerks that always operate specific POS Terminals, you may want to customise each terminal to only show the Clerks which use that terminal. If your Clerks use all terminals across the venue, you may want the same clerk buttons to appear on all terminals.
- Fast Clerk Buttons - Fast Clerk buttons are a group of buttons to the right of the Home Screen, where an image or Clerk Name can be displayed, to allow for fast clerk entry on each sale. If there is no image for a clerk saved, only the name will be displayed. Clerk images must be saved in the "C:\ProgramData\Idealpos Solutions\Idealpos\Pictures\Clerks" folder. When creating a Clerk Image, the File Name must be the same as the Clerk Code (image size is 61x61 pixels). The Clerk Code can be obtained by going to Setup > Clerks and viewing the column labelled "Code" which is shown on the left-hand side of the Clerks window.
- Fast Clerk Buttons cleared on End of Shift - There may be a large amount of clerks that use a terminal each shift. When an End of Shift function is performed, all Fast Clerk buttons are cleared and the next shift can be assigned.
- Home Screen Dark Theme - This option will cause the colour scheme of the Home Screen to be dark - suited more towards restaurants with dark lighting.
- Return to Home Screen after Each Sale - This option forces the Home Screen to show after each sale is finalised.
- Show Blackboard - This option will display the Blackboard to the left of the screen.
Setup > Yes/No Options > Miscellaneous
- Show Adult ID Date - When Show Adult ID Date is enabled, the Adult ID date will appear either at the bottom or top of the Home Screen (If Fast Clerk Buttons are enabled, the Adult ID will appear at the top of the Home Screen, if Fast Clerk buttons are disabled, the Adult ID will appear at the bottom of the Home Screen).
The Adult ID date shows the minimum Date of Birth required for the customer to be classed as an Adult, as per the Adult ID Age that's configured in Back Office > Setup > Global Options > General > Adjust ID Age. The Adult ID age can be used to assist the operator to determine if the customer meets the required age criteria for the purchase of Alcohol, Tobacco or any other age restricted products.


